
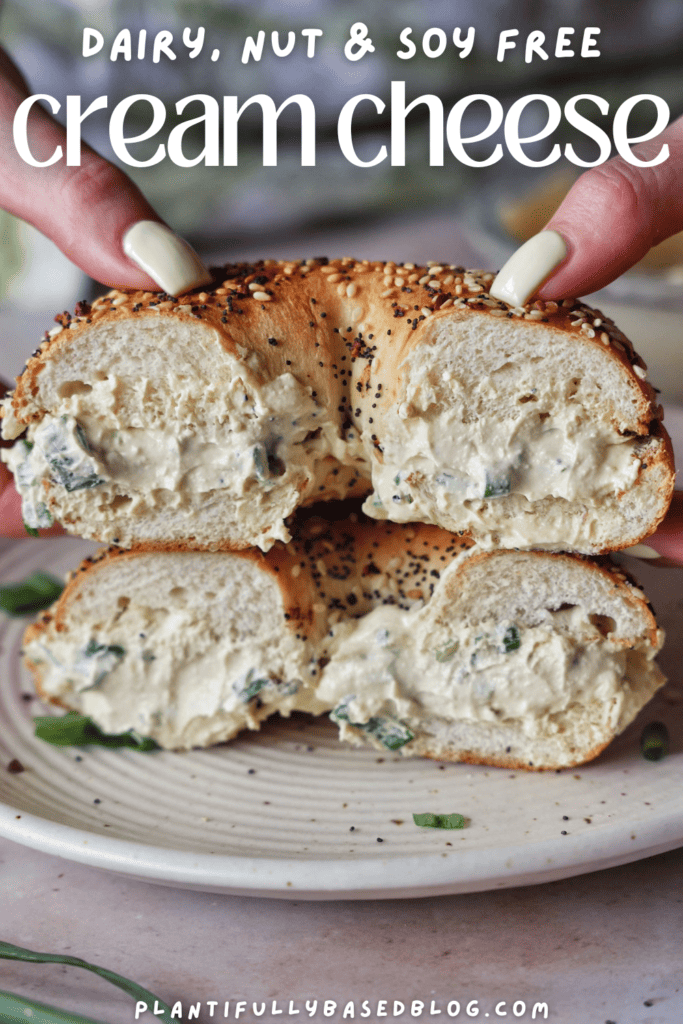
if you have been wanting to try making your own homemade vegan cream cheese now is the time! this recipe uses the traditional way of making cream cheese so the result is pretty amazing. this recipe is totally nut and soy free and you are going to love it.
I am sure you are thinking if this vegan cream cheese is nut and soy free then what the heck is it made from?! Pea protein milk! This recipe uses the traditional way of making cream cheese – adding an acid to the non-dairy milk, letting it curdle, separating the curds and then blending it to make our vegan cream cheese. The beauty of this recipe is you can use any high protein non-dairy milk that you like, as long as it has at least 7g plant protein per serving. I always opt for Ripple because it just my favorite.
What You’ll Need
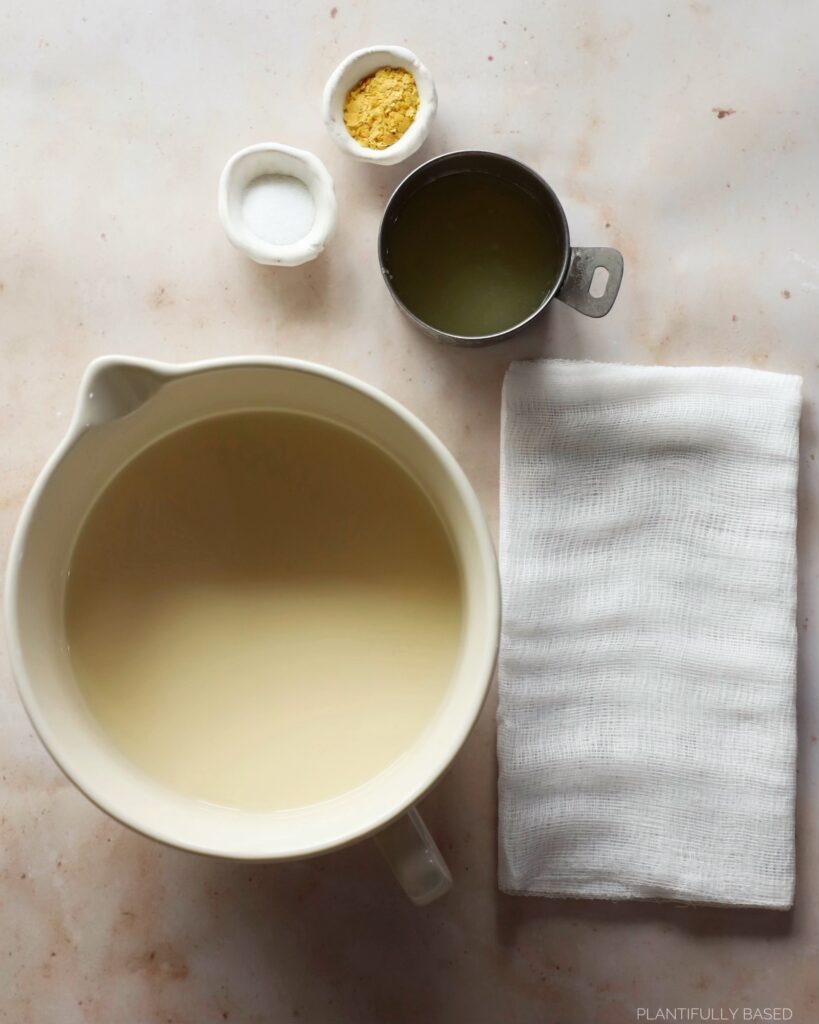
You actually only need 4 simple ingredients to make the vegan cream cheese base and cheese cloth!
- Ripple Pea Protein Milk or High Protein Non-Dairy Milk: I always opt for Ripple because I like it but you can of course use soy milk and there are other high protein non-dairy milks out there now. You need it to be higher in protein so it creates nice big curds and a lot of them. At least 7g plant protein per serving.
- Lemon Juice: the acid helps to create the curds.
- Salt: to make it salty.
- Nutritional Yeast: just a small touch to add in some extra cheesiness, you can leave it out if you like.
- Cheesecloth: easy to find at most food stores or online this will help to separate essential the non-dairy curds and whey.
Vegan Curd
So, I never really knew what curds and whey were until I got older. Essentially, the curd is the solidified part that milk leaves behind while whey is the liquid. So, with higher protein non-dairy milks we are also able to create a vegan curd and vegan whey. This curd is so important for making the vegan cream cheese. You can also use this to make homemade vegan ricotta. It is important to also use an unflavored and unsweetened non-dairy milk. I personally find soy milk to be a little sweet naturally so I opt to not to use it BUT if you like it then use it!
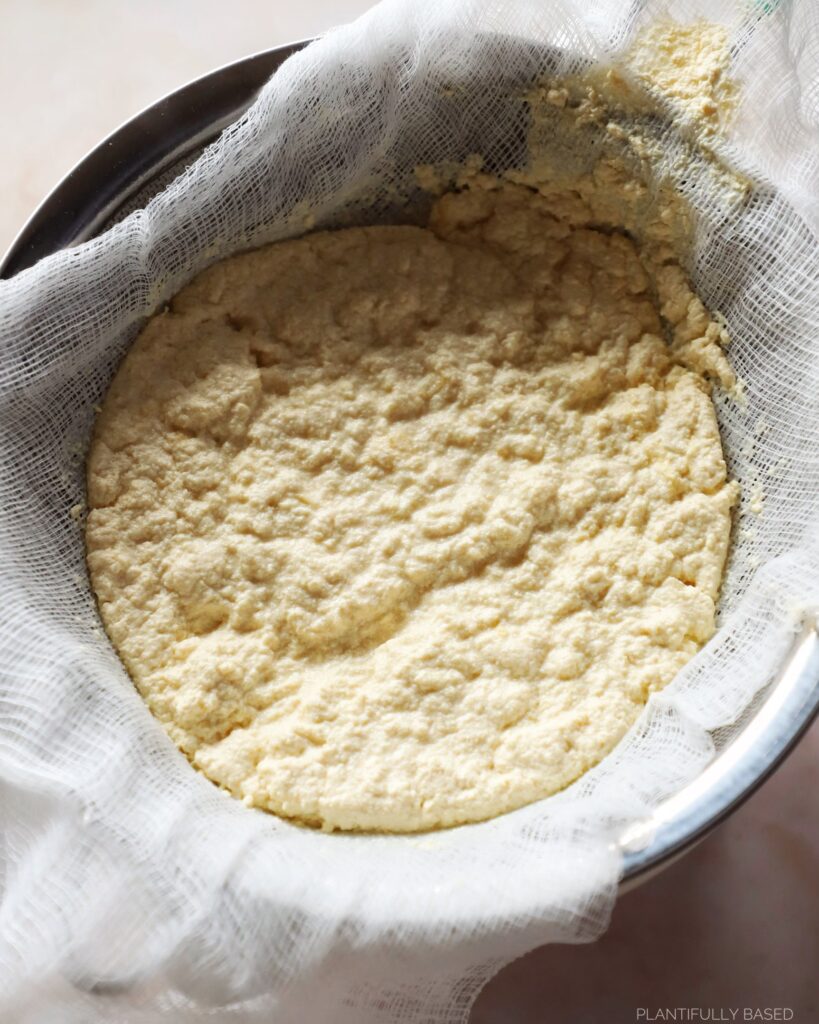
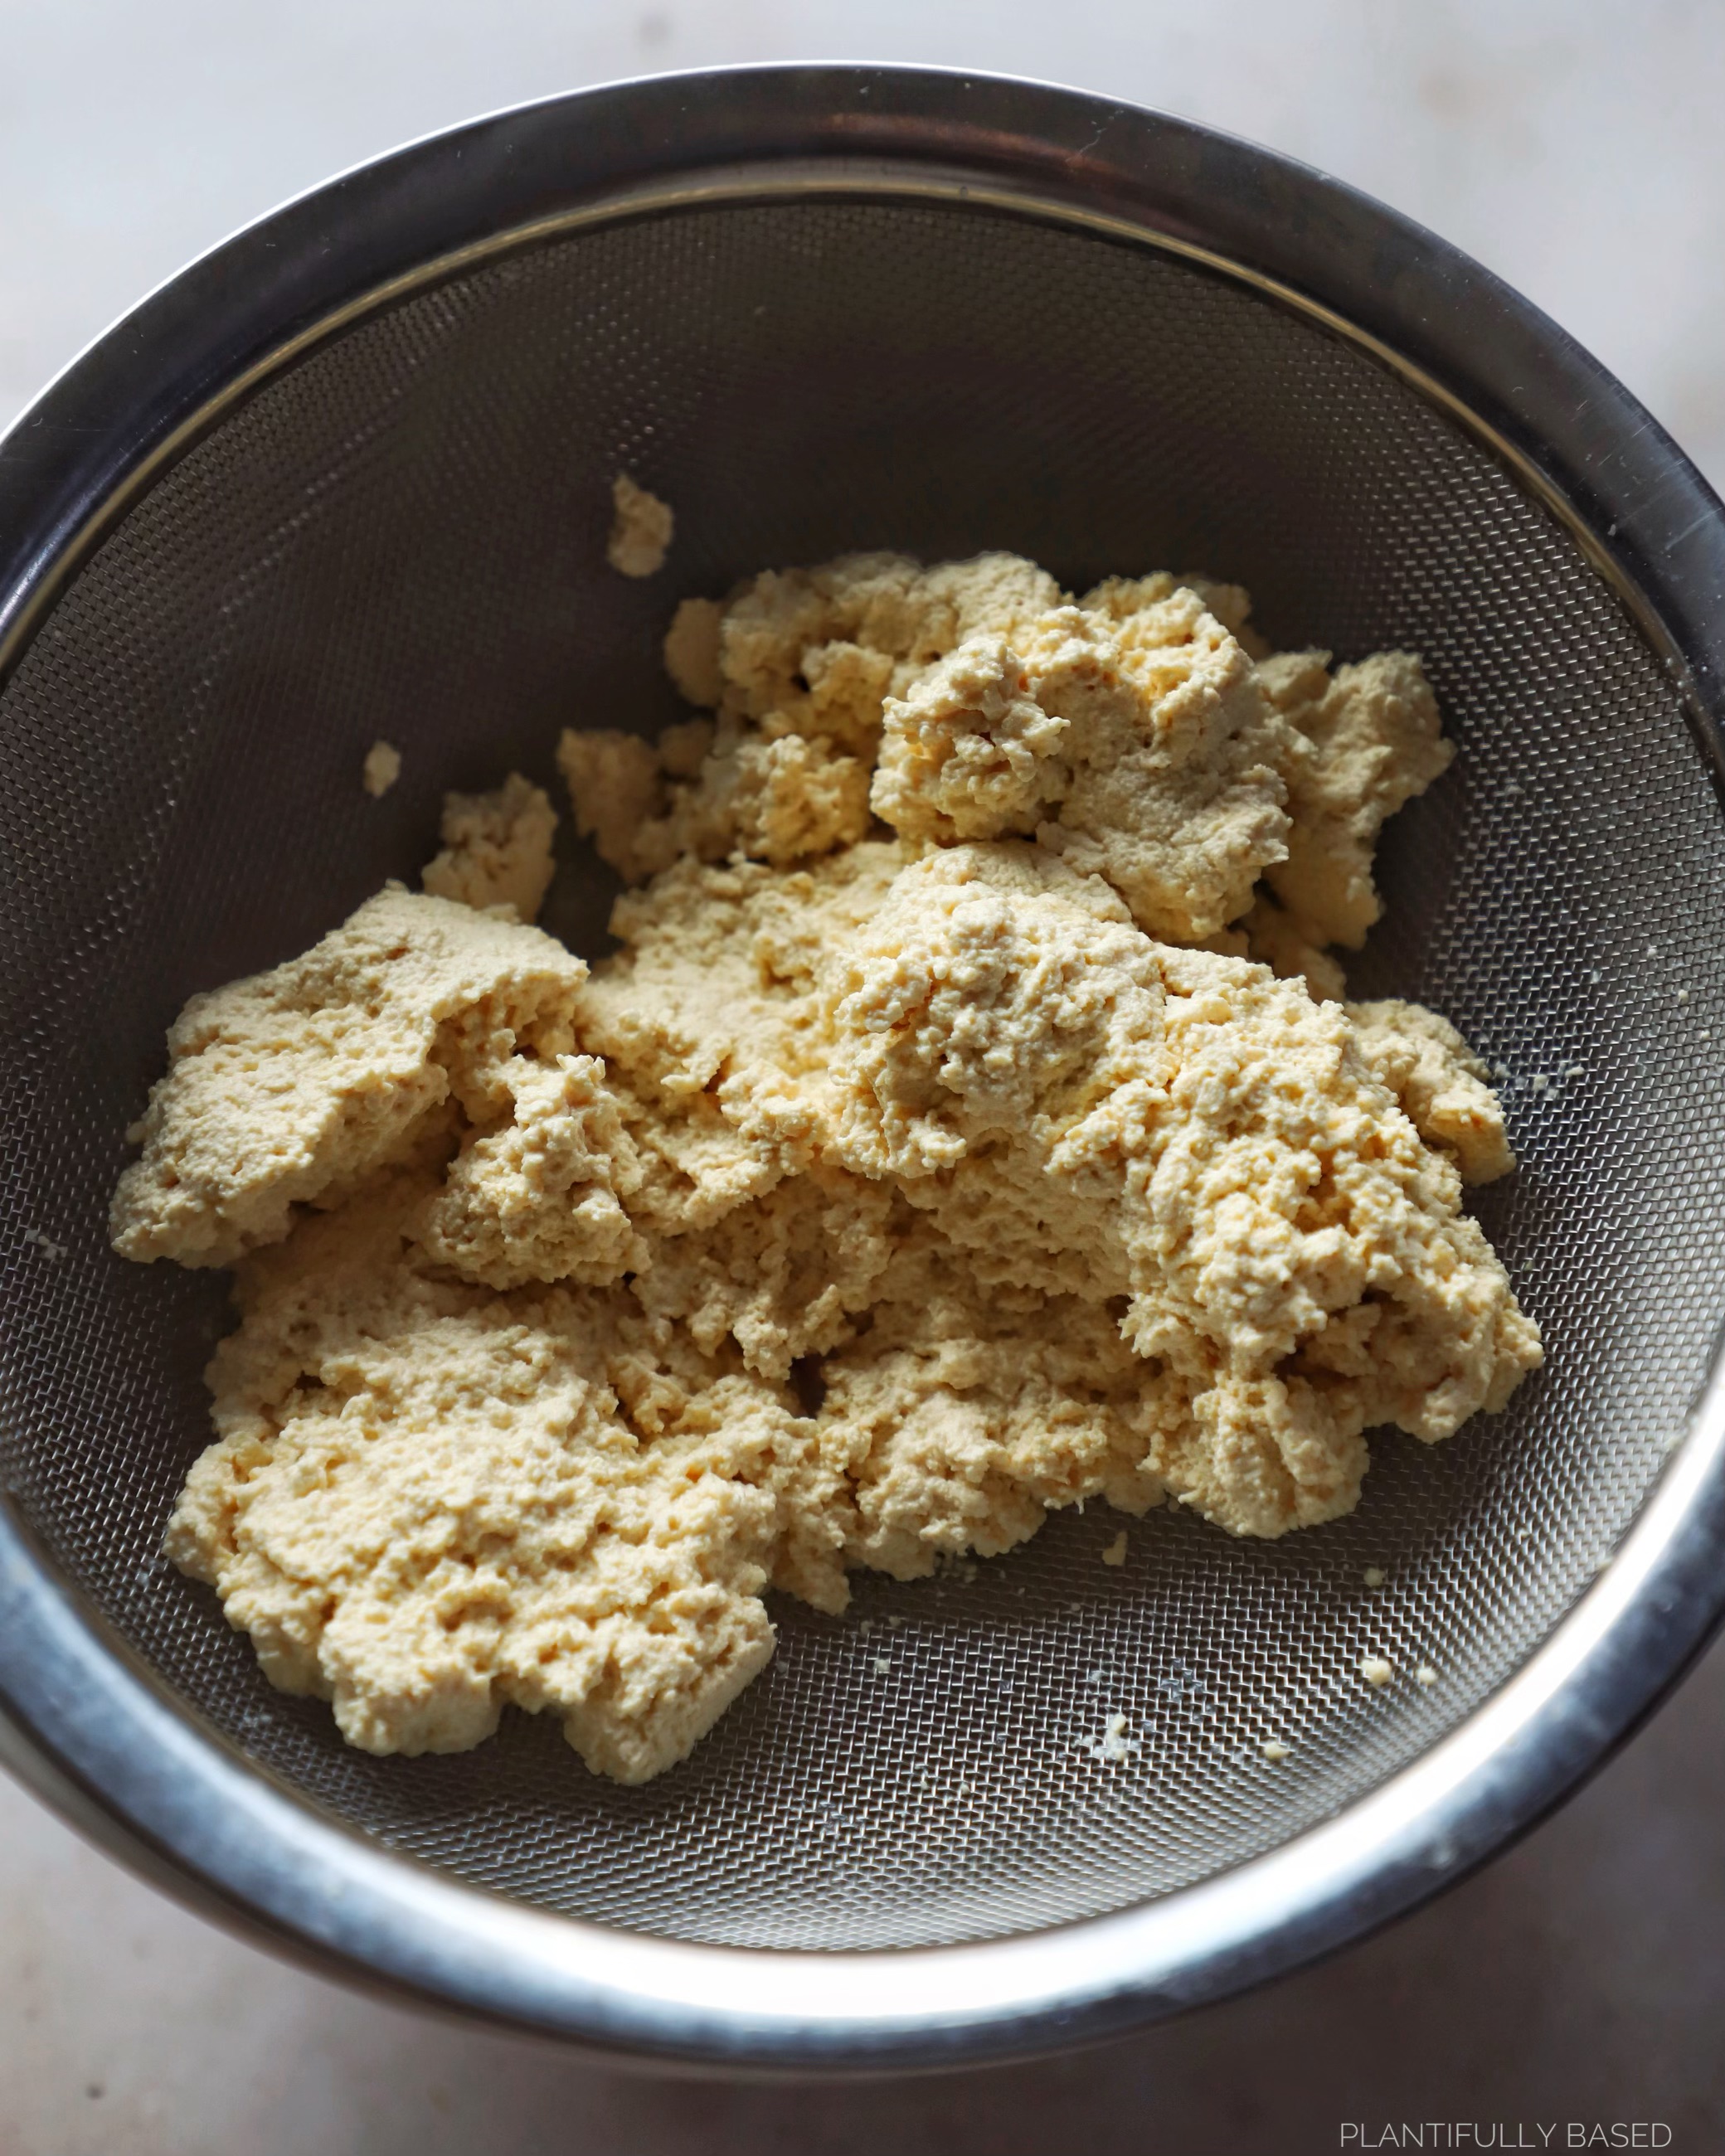
Separating the Vegan Curd and Whey
After simmering the non-dairy milk on the stove and the curds and whey form you will be left with a mixture in your pot of some solidified parts in liquid. To separate those all you will do is pour or scoop it into a cheesecloth that is sitting on a strainer and a bowl. Then let it sit for about 10 minutes or up to a half hour, depending on how much time you have. Once it is cool enough to handle you will carefully squeeze with your hands any excess liquid out and then you will be left with a bunch of the curd. It is really simple!
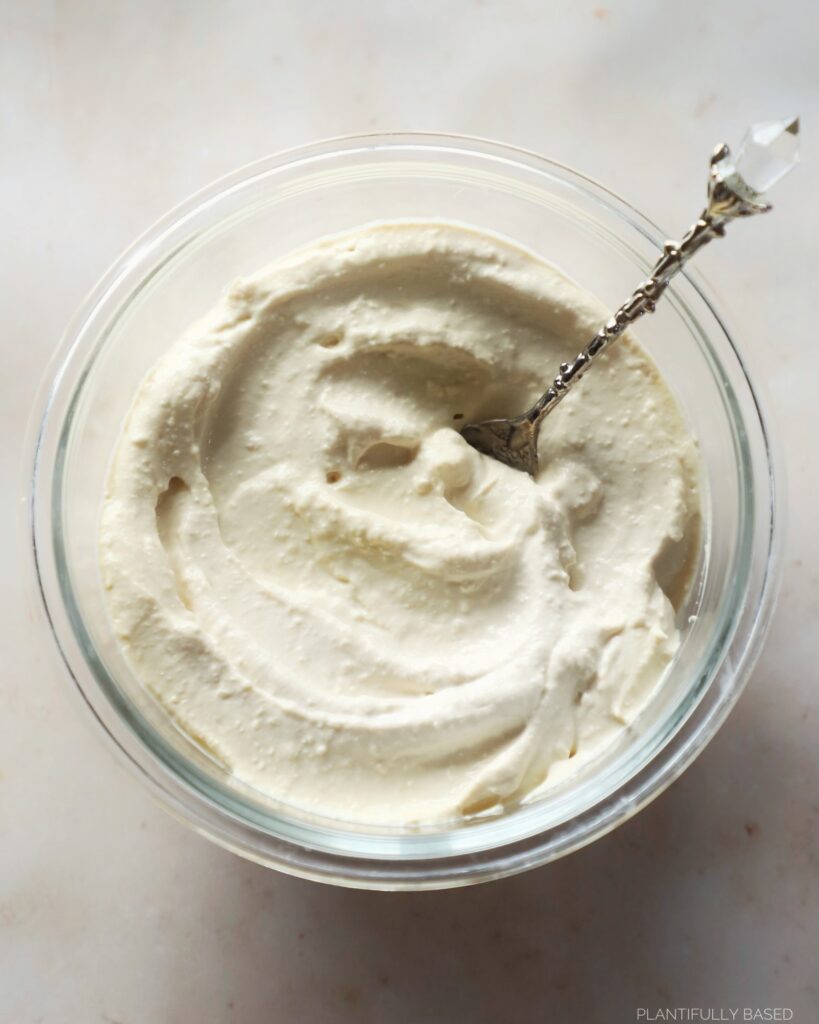
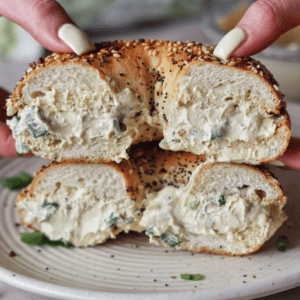
How to Turn Vegan Curds Into Vegan Cream Cheese
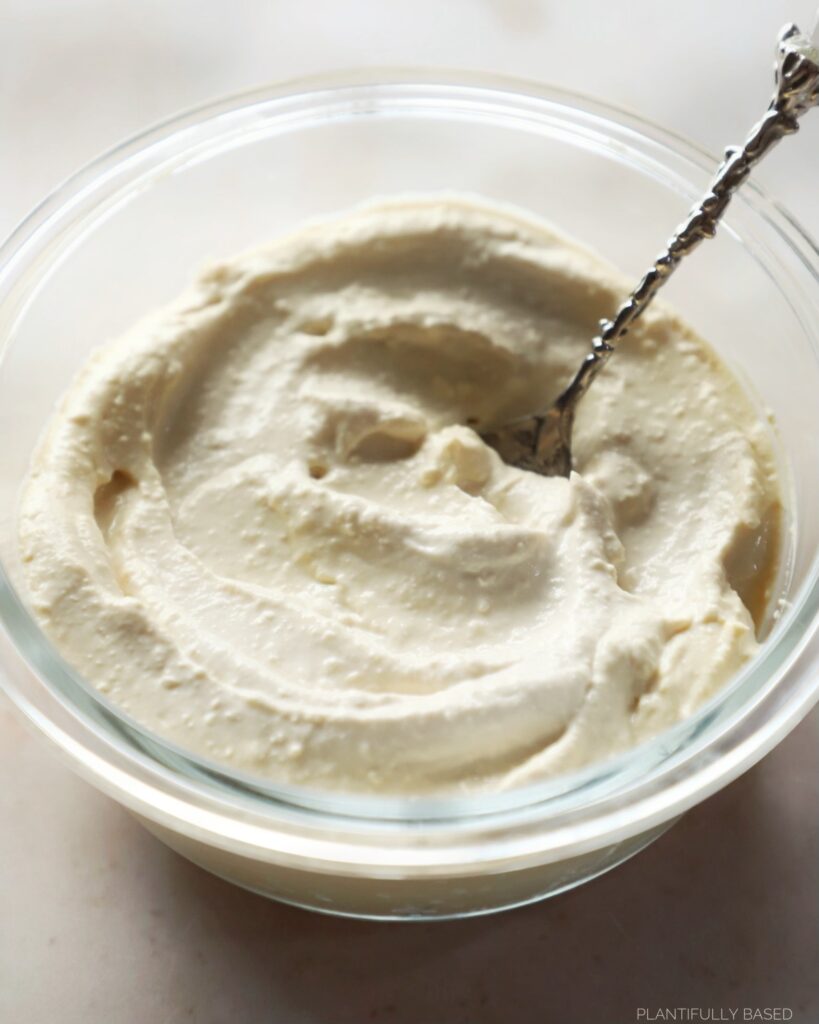
The final step is now to blend the curds up until they are super smooth and creamy, hence the name cream cheese. While blending you may want to add in a few spoonfuls of that residual liquid (vegan whey) in to help the blender. Just blend until it is smooth and creamy, it should only take about 1 to 2 minutes if that. You may need to help the blender by scraping down the sides a bit. From there your vegan cream cheese is done! You can then scoop it out and enjoy it immediately or place in the fridge. This will create a plain vegan cream cheese but of course you can add in other seasonings and flavors to create variation.
Vegan Cream Cheese Flavors
I’m from New York and the options on cream cheese flavors is truly endless. So, if you ever need some inspiration walk into a bagel shop or look at a menu online. However, here are just a few ideas.
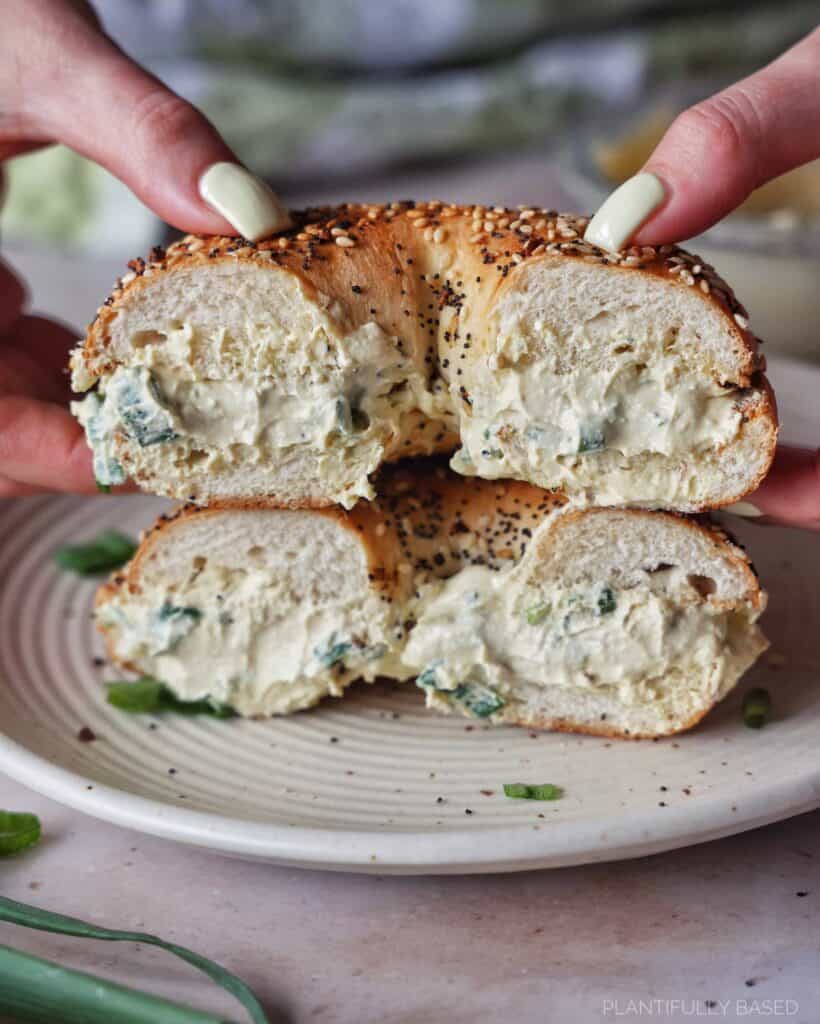
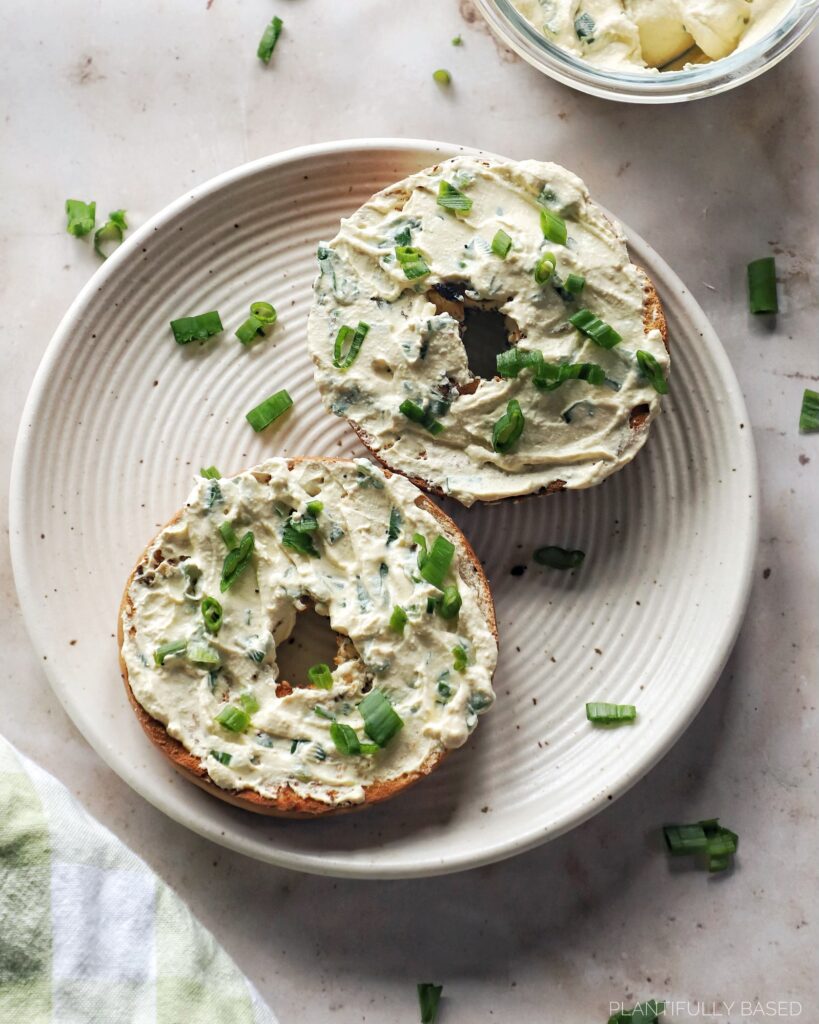
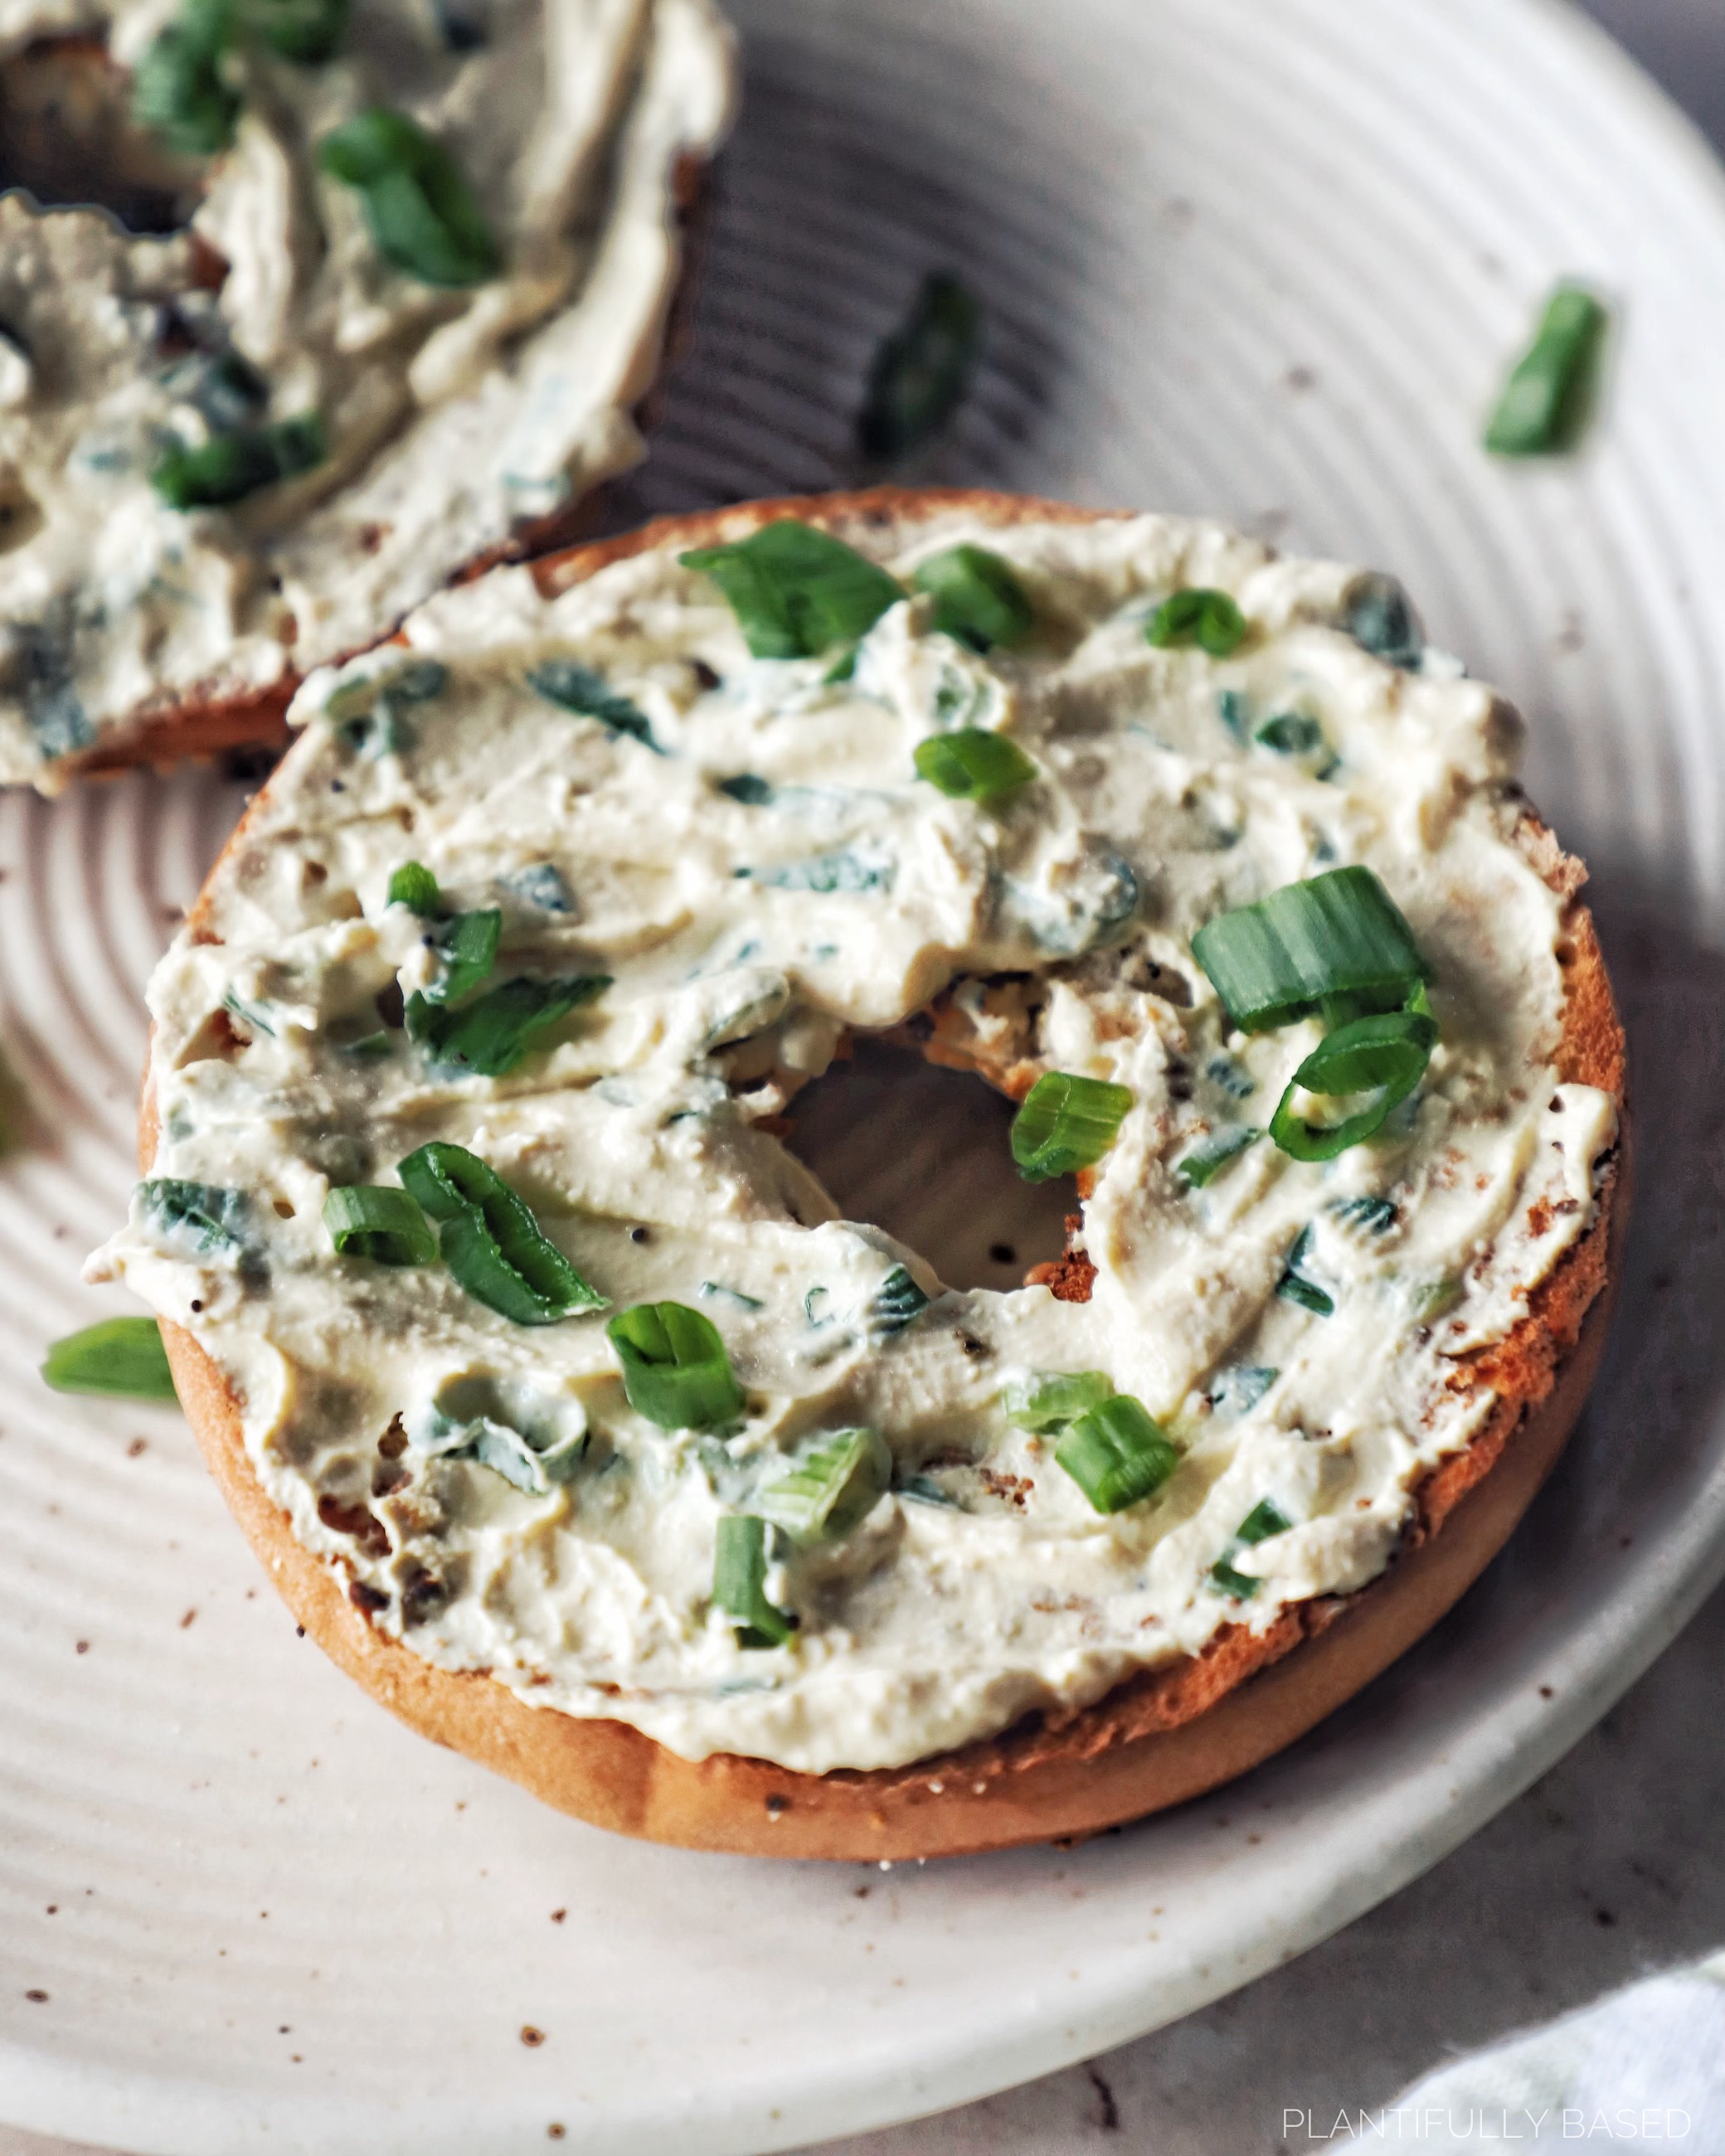
- Garlic Scallion: this is what I did for this recipe! Just added in some chopped scallions and garlic powder so yummy.
- Maple Walnut: add in some chopped walnuts and maple syrup, delicious!
- Veggie: growing up my favorite cream cheese was a veggie cream cheese so just finely chop up some bell pepper and carrot and throw it in.
- Chive: just add in some chopped up chives.
- Sun Dried Tomato: another staple you would always see in a bagel shop, chop up sun dried tomatoes and toss them in.
Of course the combinations are truly endless and people even get a little crazy with them at bagel shops doing all kinds of flavors. So, feel free to really play around and have fun with this recipe.
More Cheesy Recipes


Who Will Love This Recipe
Anyone who is vegan, dairy-free, nut-free, or soy-free! A lot of vegan cream cheeses are nut or soy based and while I personally don’t have that allergy I wanted to create a vegan cream cheese for everyone to enjoy. Cream cheese and bagels were a part of my life growing up and to be able to now enjoy it in a delicious vegan way is so amazing. I truly felt like I was back eating a bagel from a bagel shop when I bit into this!
Vegan Cream Cheese FAQ
- Is this recipe soy free? Yes.
- Is this recipe nut free? Yes.
- Is this recipe gluten free? Yes.
- Can I use a different non-dairy milk besides pea protein milk? As long as you use a high protein milk with at least 7g plant protein per serving it should work fine.
- How long does this keep in the fridge? For up to 4 days in a sealed container.
- What can I do with the leftover liquid from the curds? You can use it to bake bread, you can try using some in a smoothie (it may be too acidic), add to soups or stews, you can even freeze it in cubes and then use it later!
- Can I use this recipe to make cheesecake or frosting? I haven’t tried it for a vegan cheesecake or frosting but I do think it should work. If you want to try a vegan cheesecake recipe I have a great one on the blog! Let me know how it works out.
ORDER MY COOKBOOK
Looking for more delicious vegan comfort recipes? Order my cookbook Plantiful: Over 75 Vibrant Vegan Comfort Foods! Filled with all types of recipe from bites, breakfast, brunch, lunch, dinner, desserts and more! Available on Barnes and Noble, Amazon, IndieBound, Walmart, also available in stores.
Sharing direct links to recipes and pictures is highly encouraged, please do not copy and paste my recipes or share my pictures without permission. I work very hard on my blog and don’t want to see my recipes popping up anywhere. Thank you so much.
Homemade Vegan Cream Cheese
Equipment
Ingredients
- 4 cups (960ml) pea protein milk, unsweetened see note about milk choice
- ½ cup (120ml) lemon juice
- 1 teaspoon salt
- 1 teaspoon nutritional yeast
Instructions
- In a pot add the non-dairy milk and lemon juice. Cook on the stove for 10 minutes over medium heat, this helps the non-dairy milk to curdle.
- Place a large piece of cheesecloth over a sieve or strainer and then place in a pot to catch the liquid. Pour the curdled non-dairy milk carefully into the cheesecloth or scoop it in. Allow it to sit for at least 10 minutes (or up to 30 minutes). This will get a lot of the liquid out. Then once it is cool enough to handle use your hands to squeeze out more excess liquid.
- Transfer the curds into a blender with the salt and nutritional yeast. Blend for about 1 to 2 minutes until it is smooth and creamy. You may need to add in some additional liquid as it blends and you can use the liquid that drained from the curd (essentially a vegan whey). Adding in small spoonfuls as the blender needs about 1 to 2 teaspoons at a time.
- Taste the vegan cream cheese and add in more salt if you desire. You can enjoy on its own plain or add in other flavors with vegetables, seasonings, spices, and sweeteners. Chill in the fridge for at least 1 hour or until ready to enjoy.
Video
Notes
- In order to make this recipe work you must use a high protein milk at least 7g plant protein per serving. Please read the blog post for more information if you have other questions.
Plantifully Based® is part of the Amazon Affiliate Partner Program. Links on here may be from Amazon or other affiliate programs. If you decide to purchase through a link I will receive a small commission. This helps to run the blog and make more recipes.
Did you try this recipe? Tag me on Instagram @plantifullybased to let me know how it went. If you enjoyed this recipe please be sure to leave a comment or review, it is so helpful for the blog. Thank you!
Oh my goodness, I was dubious about this working but it turned out beautifully! I used soy milk because that is all I had in, and doubled the nutritional yeast, just because I didn’t think it would be cheesy enough for my tastebuds and for anyone wondering, the total calories for a whole batch of that was 333 and the macros: 32.1g protein, 50.8g carbs and 1.3g fat. Yeah… I’ll be making this on the regular and experimenting with add-ons for sure! Thank you for sharing!
Hi Joanne, yay!!! I am so so glad you enjoyed it! Yes good idea to double the nutritional yeast with the soy milk. Thank you for trying and leaving a review/comment!!
Wow!!! Just made this this afternoon and it’s already gone !!! Mixed in some chives and it was delicious. It was so easy to make . I won’t be buying store bought again . This is the new go to . Thanks ❤️
Hi Kirsty! Oh yay I am so happy you liked it. Thank you so much for trying it and taking the time to leave a comment and review 🙂
How long does it keep for refrigerated.
Hi! I had covered that in the FAQ section of the blog “How long does this keep in the fridge? For up to 4 days in a sealed container.”
Hi! I just made this. The texture is beautiful, but mine came out very lemon-y. I used bottled, not fresh. Maybe that was the mistake? Would it still work if I were to use ACV instead? Thank you for this fun recipe! 🙂
Hi Shayna! Ahh yes I find the bottled lemon juice to have too much of a citrus and almost cleaner-like taste so I really try to stay away from it. You can definitely make this with ACV as well!
Can I use coconut milk instead?
Hi Walishya. I do cover this a few times in the blog post that you do need a high protein non-dairy milk for this to work. Coconut milk is not high protein so it will not work, sorry! “Ripple Pea Protein Milk or High Protein Non-Dairy Milk: I always opt for Ripple because I like it but you can of course use soy milk and there are other high protein non-dairy milks out there now. You need it to be higher in protein so it creates nice big curds and a lot of them. At least 7g plant protein per serving.”
Hi Francesca, Thanks for all the interesting ideas you come up with! I have one question, and maybe it doesn’t matter, but you give two different directions here: First you write to boil the Ripple and then you say to cook it over medium heat. Those are two different things, or at least it would take a very long time to get to a boil on medium heat. And sometimes it’s important to not let liquids get to a boil. Would you mind clarifying?
Hi Anne, so I am a little confused because I never write anywhere to boil the ripple. the directions in step 1 are as follows “In a pot add the non-dairy milk and lemon juice. Cook on the stove for 10 minutes over medium heat, this helps the non-dairy milk to curdle.” so I am not sure where the boiling part came from. Can you clarify for me? Thank you!
I want to make this tomorrow and would also like to know if the milk should be boiled. In your text above the recipe you say…
SEPARATING THE VEGAN CURD AND WHEY
After you boil the non-dairy milk on the stove and the curds and whey form you will be left with a mixture in your pot of some solidified parts in liquid.
Does the liquid need to boil to form curds or is cooking for 10 minutes enough? Thanks
Hi Mary yes the milk is boiled. The first sentence of that part is “after you boil the non-dairy milk” so you will boil it first, it will cause curdling within the pot, and then you will separate them. From the instructions “In a pot add the non-dairy milk and lemon juice. Cook on the stove for 10 minutes over medium heat, this helps the non-dairy milk to curdle.
Place a large piece of cheesecloth over a sieve or strainer and then place in a pot to catch the liquid. Pour the curdled non-dairy milk carefully into the cheesecloth or scoop it in. Allow it to sit for at least 10 minutes (or up to 30 minutes). This will get a lot of the liquid out. Then once it is cool enough to handle use your hands to squeeze out more excess liquid.” If you have any other questions let me know, or watch the video for a more in depth visual process. Enjoy 🙂
Hi Francesca,
I guess we’re now all confused. 🙂
You answered to me that you never write to boil the Ripple, yet quote back to Mary “after you boil the non-dairy milk.”
This is confusing, because that large amount of Ripple wouldn’t come to a boil over just medium heat in just 10 minutes.
I don’t want to be mean — I am so grateful for all your experiments and ideas –, though, could it be that you’re not quite sure what it means to boil something? As opposed to simply cook or simmer? Again, this is not an accusation, it’s only that there are really significant differences between those states, and if it’s not clear what you mean, people could end up with disappointing results and then down-vote your recipe, even though it likely is really good.
I hope you understand where we’re coming from.
Hi Anne, okay yes I had some time to dive deep into this. It was my error to write “after boiling” in the above text in the blog section. So, there is no actual boiling that needs to occur which I do state in the video and in the recipe card. Everything written within the recipe card was always right. It was that in one of my paragraphs above I wrote boiling which again was an error on my part. I do know what boiling is 🙂 so the recipe card has always been right and it was nothing within the recipe card. Hope that clears it all up now! I have corrected the word in the body of the text.
Hi! Thank you for this recipe! I’m wondering whether it would freeze well. I’m concerned my small family wouldn’t be able to finish it all in 4 days, and I hate food waste. I could halve the recipe, of course, but if I could save myself some time and freeze it, that would be even better. Thanks!
Hi Meagan, personally I wouldn’t freeze this. It only makes about 8 ounces which is the standard cream cheese size!
Thank you so very much it is 2026 and I’m excited to start enjoying your recipes 😀 Blessings Ms.Kim
I hope you enjoy it!!!
Just made this and it turned out wonderful! Flavors are spot on and I could swear I’m eating regular cream cheese. At first I thought my milk wasn’t curdling correctly, but as soon as I poured it into the cheesecloth it separated beautifully. Thank you so much for the recipe! I’ll be trying your vegan pepper jack next! 🙂
Hi Heidi!!! Yay I am so happy you enjoyed it!!! thank you so much for trying it!
Where did you find that large white mixing bowl in this video? Love it.
i got it so many years ago I can’t remember now, I am sorry!